When you want to integrate 3rd party systems to SharePoint, you might need to add items to SharePoint Online lists with PowerShell. In this article, you learn, how to do it for each data type.
Table of Contents
Use Case
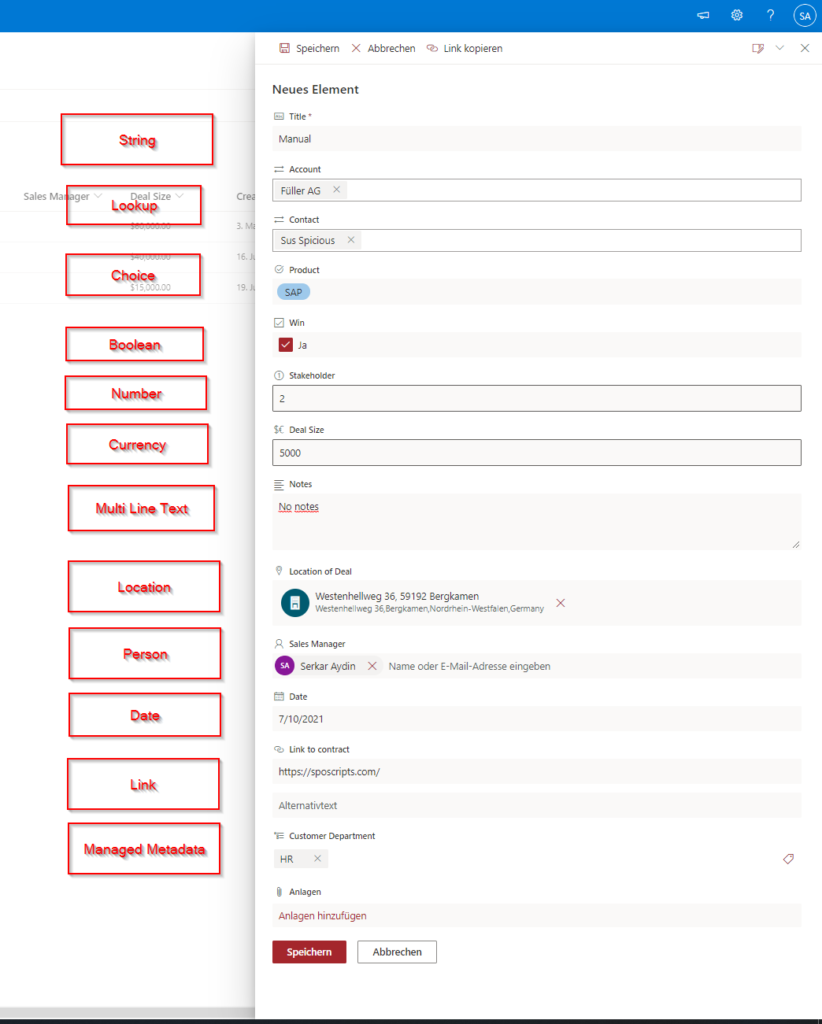
I want to add new oppurtunities as items to my sales list. The aim is to add all values for this various items.

Step 1 – Connect to SharePoint Online
In order to add items to SharePoint Online lists with PowerShell, you have to connect to SharePoint with PNP.PowerShell. If you never herad of it, read this article: Connect to SharePoint Online with PowerShell (sposcripts.com)
Since I want to use it for automation purposes, I am using a credential object.
param
(
    $SiteUrl = "https://devmodernworkplace.sharepoint.com/sites/Sales"
)

$Credential = Get-Credential

Connect-PnPOnline -Url $SiteUrl -Credential $Credential
You’ll be prompted for credentials. If you want to prevent prompting, make use of following method:
Step 2 – Get your list
I want to add the items to the opportunites list, and since I know the internal name of the list, I can get it like this.
$ListName = "Opportunities"
$List = Get-PnPList -Identity $ListName
If you are not sure about your list name, you can also get your list interactively name like this.
Get-PnPList | Out-GridView -PassThru
Take the ID or Name of the list and put it in the script.

If you didn’t know about the interactive way of getting items, checkout the post: How to filter for PowerShell objects easily – SPO Scripts
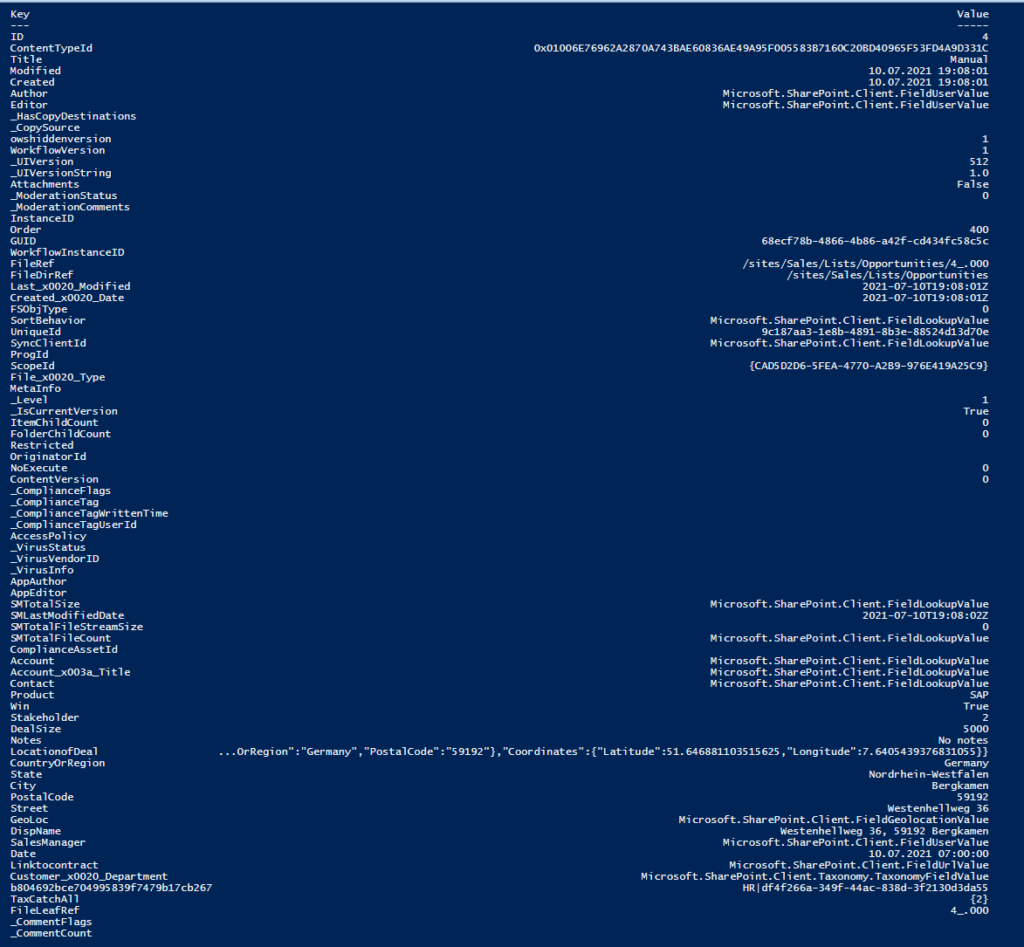
Step 3 – Get the internal field values of your list
In order to code according to the right syntax, you have to know the internal name of the columns. To do this, checkout the post: Getting FieldValues of Items – SPO Scripts
So in this case I am getting the last item and retrieving the field values.
$Item = Get-PnPListItem -List $List  | Select-Object -Last 1
$Item.Fieldvalues

You have to create a hashtable of the desired columns you want to fill.
$Values = @{
"KEY"= "VALUE"
}
In my example it is
$Values = @{
"Title"= "Automation"
"Stakeholder" = 2
}
Step 4 – Add your Item
So now it gets exciting. You can add your items like this.
$Values = @{
"Title"= "Automation"
"Stakeholder" = 2
}

Add-PnPListItem -List $List -Values $Values
In the following I will show you how to add the values for each column type.
Add String value
Adding string is the simplest way. You have to do it like this:
$Values = @{
"Title"= "Automation"
"Stakeholder" = 2
}

Add-PnPListItem -List $List -Values $Values
The result:

Add Integer value
You have to put the value without quotes.
$Values = @{
"Stakeholder" = 2
}

Add-PnPListItem -List $List -Values $Values
The result:

Add Multi line text value
When a new line starts, you just can make use of enter to create a new line.
$Values = @{
"Notes"= "Customer was very glad,

Hopefully he closes the deal"
}

Add-PnPListItem -List $List -Values $Values
The result:

Add Boolean Value
You can use the variables $true and $false for describing the value
$Values = @{
"Win"= $true
}

Add-PnPListItem -List $List -Values $Values
The result:

Add Link value
$Values = @{
"Linktocontract"= "https://sposcripts.com"
}

Add-PnPListItem -List $List -Values $Values
The result:

Add Date Value
Caution: You have to consider that the date, you have entered is your timezone. The date will be parsed and transfered to universal time. If you want it in your time, you have to add the amount of hours depending on your timezone offset.
I live in Germany, so I add a offset of 2 hours (summer time).
Add Date Value (no time)
$Date = get-date 10/07/2021
$Date = $Date.AddHours(2)

$Values = @{
"Date" = $Date
}

Add-PnPListItem -List $List -Values $Values
If you live in universal timezone, you can even add it like this. Checkout your timezone here: Default Time Zones | Microsoft Docs
$Values = @{
"Date" = "10/07/2021"
}

Add-PnPListItem -List $List -Values $Values
The result:

Add Date value (with time)
$Date = Get-Date "05:01 10/07/2021"

$Values = @{
"Date" = $Date
}

Add-PnPListItem -List $List -Values $Values
The result:

Add Currency Value
It is very similar to integer values
$Values = @{
"DealSize" = 8000
}

Add-PnPListItem -List $List -Values $Values
The result:

Add Metadata Value
We assume following Term store:

Add Metadata Value (single value)
We have to get the term, add it to the array departments and add the array to the hash table values.
$Values = @{}
$Departments = @()

Get-PnPTerm -TermGroup 'Company Terms' -TermSet 'Departments' -Identity 'HR' |
 Select-Object id -ExpandProperty id  |
 ForEach-Object {$Departments += ($_.guid).tostring() }

$Values.Add('Customer_x0020_Department', $Departments)

Add-PnPListItem -List $List -Values $Values
The result:

Add Metadata Value (multiple values)
We have to get the terms, add them to the array departments and add the array to the hash table values.
$Values = @{}
$Departments = @()

Get-PnPTerm -TermGroup 'Company Terms' -TermSet 'Departments' -Identity 'HR' |
 Select-Object id -ExpandProperty id  |
 ForEach-Object {$Departments += ($_.guid).tostring() }

Get-PnPTerm -TermGroup 'Company Terms' -TermSet 'Departments' -Identity 'Legal' |
 Select-Object id -ExpandProperty id  |
 ForEach-Object {$Departments += ($_.guid).tostring() }

$Values.Add('Customer_x0020_Department', $Departments)

Add-PnPListItem -List $List -Values $Values
The result:

Add Person Field Value
Add Person Field Value (single person)
You can achieve adding persons to a person field by the mail address
$Values = @{
"SalesManager" = "[email protected]"
}

Add-PnPListItem -List $List -Values $Values
The result:

Add Person Field Value (multiple persons)
You can achieve adding persons to a person field by the mail adress Syntax Highlighter
$Values = @{}

$Persons = @("[email protected]", "[email protected]")
$Values.Add('SalesManager', $Persons)

Add-PnPListItem -List $List -Values $Values
The result:

Add Lookup value
First you got to determine the ID of the value, which you want to lookup in the other list. After determining it, you can add the looked up attribute to your item.
$Account= Get-PnPListItem -List "Accounts" | Where-Object {$_.Fieldvalues.Title -eq "Füller AG"}

$Values = @{
"Account"= $Account.id
}

Add-PnPListItem -List $List -Values $Values
The result:

Add Location value
This one is the trickiest. You have to know the complete adress and coordinates.
$Address = @{
"Street" = "Westenhellweg 36"
"City" = "Bergkamen"
"State" =  "Nordrhein-Westfalen"
"CountryOrRegion" = "Germany"
"PostalCode" = "59192"
}

$Coordinates = @{
"Longitude" = [double]"7.6405439376831055"
"Latitude" = [double]"51.646881103515625"
}

$DisplayNameLocation = $Adress["Street"]+ ", " + $Adress["Postalcode"] + " " +$Adress["City"]

$Location = @{
"DisplayName" = $DisplayNameLocation
"Address"= $Address
"Coordinates" = $Coordinates
}

$Location = $Location | ConvertTo-Json

$Values = @{
"LocationofDeal"= $Location
}

Add-PnPListItem -List $List -Values $Values
The result:

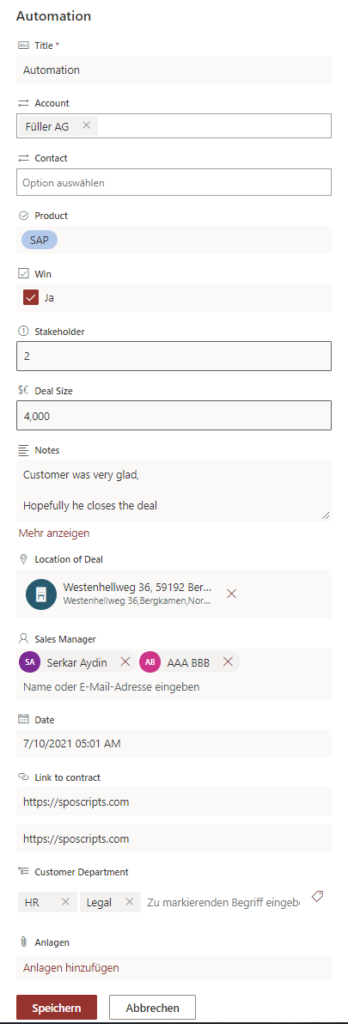
Bonus: Adding all types of values in one item
param
(
    $SiteUrl = "https://devmodernworkplace.sharepoint.com/sites/Sales"
)

$Credential = Get-Credential

Connect-PnPOnline -Url $SiteUrl -Credential $Credential

$ListName = "Opportunities"
$List = Get-PnPList -Identity $ListName

<# Determine internal names of columns

$Item = Get-PnPListItem -List $List -Id 4
$Item.Fieldvalues
#>

$Date = Get-Date "05:01 10/07/2021"

$Values = @{
"Title" = "Automation"
"Stakeholder" = 2
"Notes"= "Customer was very glad,

Hopefully he closes the deal"
"Win"= $true
"Linktocontract"= "https://sposcripts.com"
"Date" = $Date
"DealSize" = 4000
}

$Account= Get-PnPListItem -List "Accounts" | Where-Object {$_.Fieldvalues.Title -eq "Füller AG"}
$Persons = @("[email protected]", "[email protected]")

#region define departments
$Departments = @()

Get-PnPTerm -TermGroup 'Company Terms' -TermSet 'Departments' -Identity 'HR' |
 Select-Object id -ExpandProperty id  |
 ForEach-Object {$Departments += ($_.guid).tostring() }

Get-PnPTerm -TermGroup 'Company Terms' -TermSet 'Departments' -Identity 'Legal' |
 Select-Object id -ExpandProperty id  |
 ForEach-Object {$Departments += ($_.guid).tostring() }

#endregion

#region define location
$Address = @{
"Street" = "Westenhellweg 36"
"City" = "Bergkamen"
"State" =  "Nordrhein-Westfalen"
"CountryOrRegion" = "Germany"
"PostalCode" = "59192"
}

$Coordinates = @{
"Longitude" = [double]"7.6405439376831055"
"Latitude" = [double]"51.646881103515625"
}

$DisplayNameLocation = $Adress["Street"]+ ", " + $Adress["Postalcode"] + " " +$Adress["City"]

$Location = @{
"DisplayName" = $DisplayNameLocation
"Address"= $Address
"Coordinates" = $Coordinates
}

$Location = $Location | ConvertTo-Json
#endregion

$Values.Add('Customer_x0020_Department', $Departments)
$Values.Add('SalesManager', $Persons)
$Values.Add('Account',$Account.Id)
$Values.Add('LocationofDeal',$Location)

Add-PnPListItem -List $List -Values $Values

Conclusio
As you can see, you can add item to SharePoint Online lists with PowerShell with the scripts I provided. I hope I have saved you a ton of work :).
Photo by Conscious Design on Unsplash

Pingback: Create SharePoint list items using Graph API (PowerShell)
Pingback: Cheatsheet: Add items to SharePoint Online lists – 365 admin service