In the previous article I was showcasing how to create a SharePoint Site with PNP.PowerShell. In this article I want to elaborate how to create a SharePoint Site with MS Graph.
Creating SharePoint Sites with MS Graph can be interesting for integration scenarios as part of a overarching process. Let’s assume, that you want to create a SharePoint Site for each Sales opportunity or whenever a new Project is initiated, for this purpose it makes sense to create SharePoint Sites using Graph.
The benefit for this approach in comparison to the PNP.PowerShell is, that you don’t need PowerShell for it, so you could theoretically also leverage every other programming language. In this article, I will create SharePoint sites using Graph in PowerShell, but you can easily replicate the approach to every different programing language as long as you stick to the foundation.
You could create the SharePoint Sites using either a user account or an Azure Application Permission. In this article I will explain the SharePoint site creation based on an Azure Application Registration.
In this article, I’ll leverage the MS Graph call POST /groups. With the creation of the M365 Group, a SharePoint teams site will be created.

Table of Contents
Why would you prioritize direct Graph Access vs Pnp.Powershell?
There are integration scenarios, where you cannot install PowerShell modules. Either because it is not permitted by your organization or because your automation execution host is not using PowerShell as the programing language. This might be the case when you use ServiceNow Orchestration. Having an standard REST API adds flexibility in comparison to a PowerShell module, which can be only used on PowerShell execution hosts.
Prerequisites to Create SharePoint Sites using Graph
In order to create SharePoint Sites using Graph, you need to setup an App Registration in Azure Portal. The App Registration needs to have following permission.
| Permission type | Least privileged permissions | Higher privileged permissions |
|---|---|---|
| Delegated (work or school account) | Group.ReadWrite.All | Directory.ReadWrite.All |
| Delegated (personal Microsoft account) | Not supported. | Not supported. |
| Application | Group.Create | Directory.ReadWrite.All, Group.ReadWrite.All |
Looking forward, I’ll utilize the Application permission Group.Create following least privilege principles.
Azure App Registration to Create SharePoint Sites using graph
In order to create SharePoint sites using Graph, we need the Azure App registration considering the aforementioned application permission Group.Create.
To create the Azure App Registration, browse to the Azure App Registration page in the Microsoft Azure Portal:

Click on New registration:

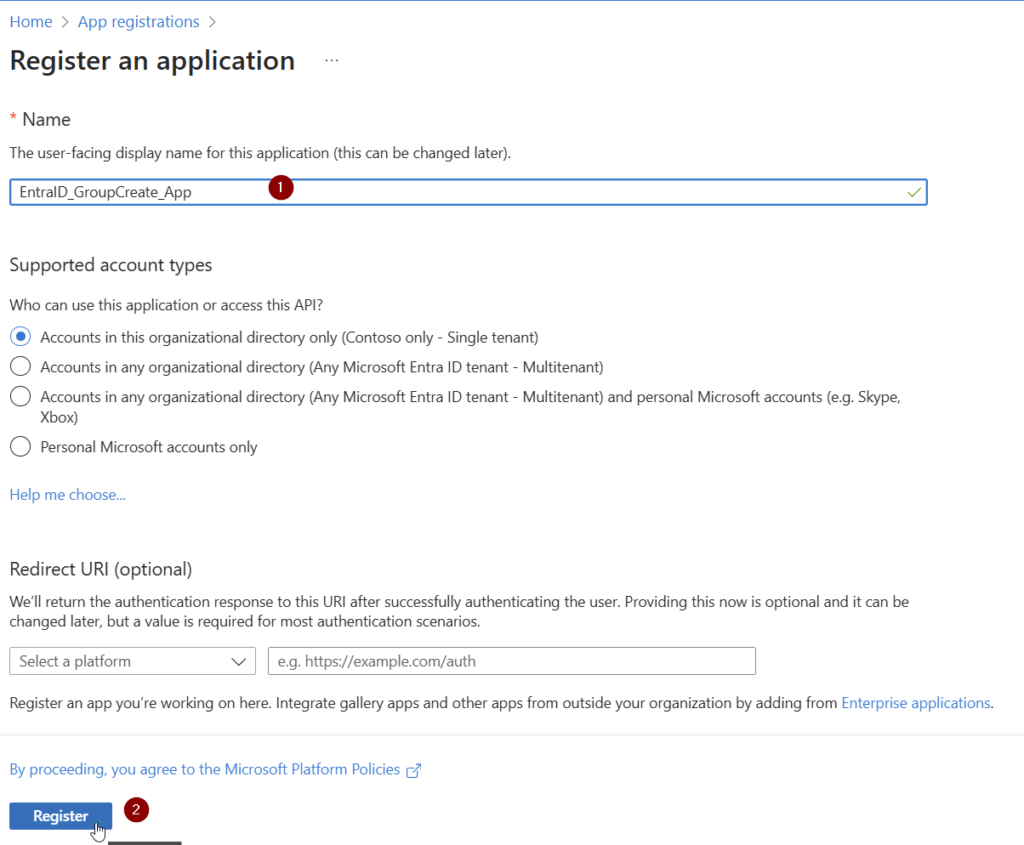
Provide a meaningful name and register the App by clicking on Register.
Click on API Permissions

By default the App is able to read user information from Entra ID. Click on Add a permission to add permissions.

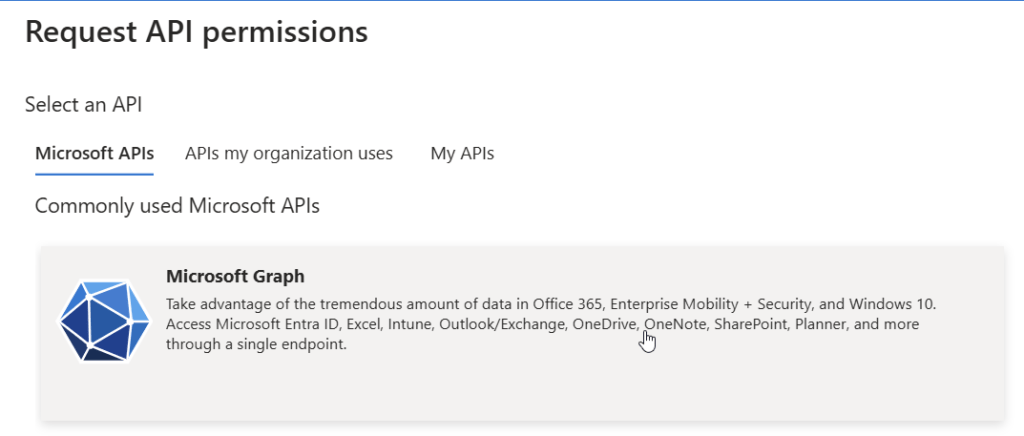
Now select Microsoft Graph
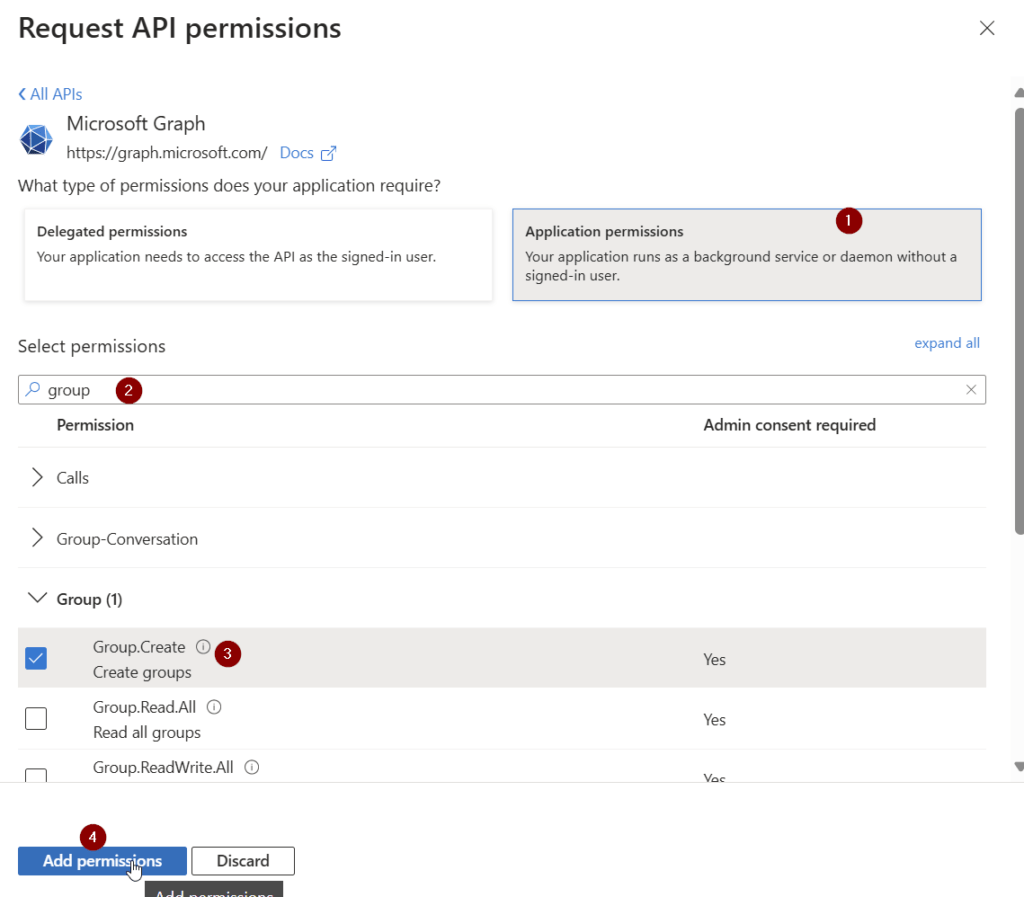
Now click on Application Permissions, search for Group and provide the Group.Create permission.
Now you have requested the permission. Make sure that the permission is also granted. You can grant it by a Global Administrator, Application Administrator, or Cloud Application Administrator.

Once the permission is granted, the page should look like this:

Now we made sure that the App registration is created and the necessary permissions are granted. We just need to make sure to configure the authentication of the Application. There are two approaches, which can be used to authenticate with Entra ID:
- Certificate based authentication
- Secret based authentication
For this article, I’ll use the secret based authentication. However in production use, consider using a certificate, which is considered to be more secure.
Browse to the Certificates and secrets blade, click on Client secrets and on New client secret.
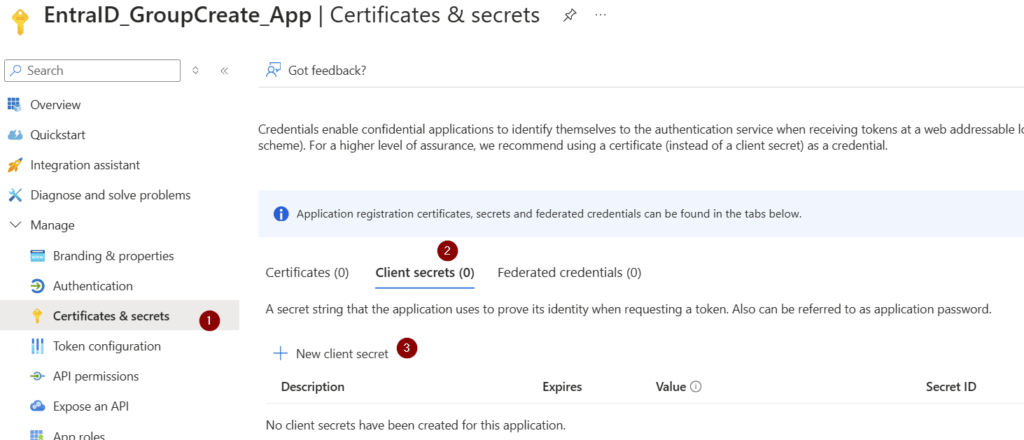
Provide a meaningful name to the client secret. I’ll use GroupMgmt_GroupCreate_180days and configure the lifetime. I’ll use the default lifetime of 180 days. Before expiration you need to make sure to create an additional client secret, and change it in your code. Else your app and the use case won’t work.

After addition, you’ll be shown only once the value of the client secret. Make sure to store it in a secure place like a key vault.

Create SharePoint Site Using Graph: PowerShell code
With the code below you can create SharePoint Sites using Graph with PowerShell. Before you run the code, make sure that you change the parameters.
If you trigger the code below, you’ll get prompted the app secret, which you have created previously.
How can I avoid getting prompted on Windows?
To avoid getting prompted each time for the app secret value, make sure to export it like this:
Make sure that you export the credential with the user account, with which you want to run the code, and also the machine, on which the code shall run. If you copy the credential xml to another machine or try to decode the credential file with a different user account, you’ll notice that you won’t be able to do so.
If you use the PowerShell code in Azure (like in Azure Automation, Azure Functions), make sure that you store the credentials in a secure place e.g. Azure Key Vault.
# Export the Credential path to specified path
Get-Credential | Export-CliXml -Path c:\creds\credential.xml

# Import the credential object from specified path
$Credential = Import-CliXml -Path c:\creds\credential.xml
The code below is first attempting to obtain a bearer token from Entra Id. Once the token is obtained, it is intended to create an Entra ID group, based on which the SharePoint Site is getting created.
# Define parameters for the tenant, application ID, site name, and mail nickname
Param (
    # The Azure AD tenant ID for authentication
    $Tenant = "m365x16735261",
    # The Application (client) ID of the registered Azure AD application
    $AppID = "730efedf-b000-4deb-92c6-25da0e27e24d",
    # The display name of the group to be created
    $SiteName = "GraphSite7",
    # The mail nickname for the group (used for email addressing)
    $Mailnickname = "GraphSite7"
)

# Securely prompts for application credentials (Client ID and Secret)
#$AppCredential = Get-Credential -UserName $AppID -Message "Enter the client secret"

# Function to obtain the Microsoft Graph API token
function Get-GraphToken {
    param (
        [string]$Tenant,
        [PSCredential]$AppCredential
    )

    # Define the required scope for accessing the Microsoft Graph API
    $Scope = "https://graph.microsoft.com/.default"

    # Prepare the body for the token request with client ID, client secret, and scope
    $Body = @{
        client_id = $AppCredential.UserName                     # Client ID from app registration
        client_secret = $AppCredential.GetNetworkCredential().password   # Securely retrieve the client secret
        scope = $Scope                                         # API scope required for MS Graph API access
        grant_type = 'client_credentials'                      # Grant type for app-only authentication
    }

    # Azure AD endpoint to request an OAuth token
    $GraphUrl = "https://login.microsoftonline.com/$($Tenant).onmicrosoft.com/oauth2/v2.0/token"

    try {
        # Request the access token from Azure AD
        $AuthorizationRequest = Invoke-RestMethod -Uri $GraphUrl -Method "Post" -Body $Body
        # Retrieve the access token from the response
        return $AuthorizationRequest.Access_token
    } catch {
        # Handle authentication errors, if any
        Write-Error "Error during token retrieval: $_"
        return $null
    }
}

# Call the Get-GraphToken function and store the result
$Access_token = Get-GraphToken -Tenant $Tenant -AppCredential $AppCredential

# Check if access token is successfully obtained
if (-not $Access_token) {
    Write-Error "Failed to retrieve access token. Exiting script."
    return
}

# Set the Authorization header with the bearer token for API requests
$Header = @{
    Authorization = "Bearer $Access_token"              # Bearer token for API authorization
    "Content-Type" = "application/json"                 # JSON content type for the request body
}
Write-Output "Access token retrieved successfully."

#region create site
# Define the group properties for the new group creation request
$Body = @{
    displayName = $SiteName                   # Name displayed for the new group in Azure AD
    groupTypes = @("Unified")                 # "Unified" indicates an Office 365 group
    mailEnabled = $false                       # Enable mail functionality for the group
    mailNickname = $Mailnickname              # The mail alias for the group, unique for Microsoft 365 groups in the organization
    securityEnabled = $false                  # Indicates that this is not a security group
}

# Set the endpoint URL for creating a group in Microsoft Graph API
$Url = "https://graph.microsoft.com/v1.0/groups"
# Convert the group properties to JSON format required for the API request
$BodyJSON = $Body | ConvertTo-Json -Compress

try {
    # Send the HTTP POST request to create the group with the defined properties
    $response = Invoke-RestMethod -Uri $Url -Headers $Header -Method Post -Body $BodyJSON
    # Output the ID of the newly created group for confirmation
    Write-Output "Group created successfully: $($response.id)"
    Write-Output "Site created succesfully: $SiteName"
} catch {
    # Handle errors that may occur during the group creation request
    Write-Error "Failed to create group: $_"
}
#endregion
Upon submission of the code, you’ll get following similar output:

With the execution of the code, the SharePoint site https://m365x16735261.sharepoint.com/sites/GraphSite8 was just created:

Create SharePoint Sites using Graph: Postman
I want to showcase the strength of the usage of MS Graph by showing how to create SharePoint sites with Postman. The approach consists of a two staged process: Obtain Bearer Token and creation of Entra ID group.
Create SharePoint Sites using Graph: Postman – Prerequisites
Make sure that you install Postman or utilize the web version of postman. You can download it from the official website: Postman API Platform
Create SharePoint Sites using Graph: Postman – Obtain bearer token
To create the bearer token, you need to trigger a POST call for the endpoint https://login.microsoftonline.com/<tenanturl>/oauth2/v2.0/token
In my example it is: https://login.microsoftonline.com/m365x16735261.onmicrosoft.com/oauth2/v2.0/token
Make sure you maintain following body as x-www-form-urlencoded:
| Key | Value |
|---|---|
| grant_type | client_credentials |
| client_id | <app id of the Azure App registration> In my example: 730efedf-b000-4deb-92c6-25da0e27e24d |
| client_secret | <secret of the Azure App registration> |
| scope | .default |
Your call shall look like this:

After calling it you should receive a bearer token as part of a response:
{
    "token_type": "Bearer",
    "expires_in": 3599,
    "ext_expires_in": 3599,
    "access_token": "eyJ0eXAiOiJKV1QiLCJub2...<SANITIZED>"
}
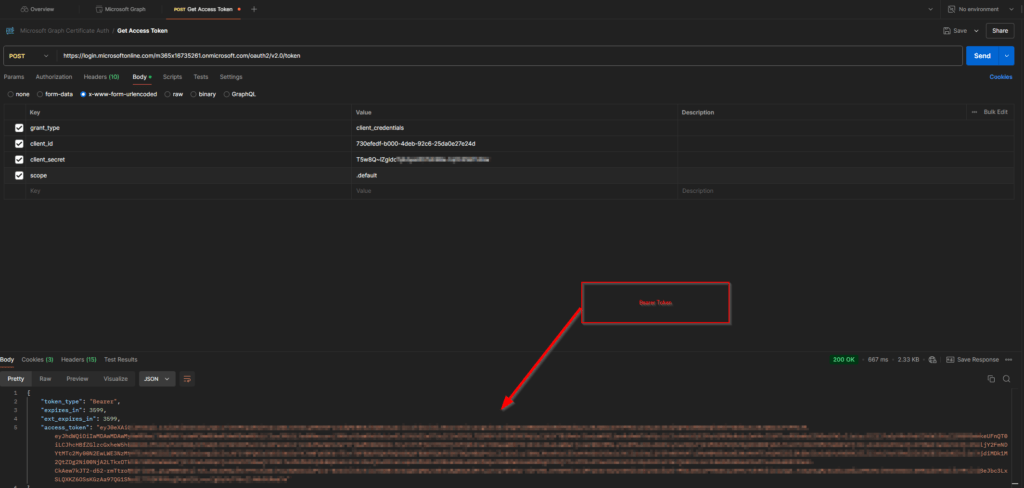
Copy the bearer token value, you’ll need it in the next step.
Create SharePoint Sites using Graph: Postman – Create Group
Now as you have obtained the bearer token, create another tab and make sure to Enter following header information:

| Key | Value |
| Content-Type | application/json |
| Authorization | Bearer eyJ0eXAiOiJKV1QiLCJub25jZSI6ImkyQUxLTktKMVpoRXdTU2xoWDJrYXZ1a09IRVFocUdQMnRESzhGWS1naGciLCJhbGciOiJSUzI1NiIsIng1dCI6IjNQYUs0RWZ5Qk5RdTNDdGpZc2EzWW1oUTVFMCIsImtpZCI6<SANITIZED> |
Proceed with the body configuration:

Provide the body as JSON. Make sure to adjust it based on your scenario:
{
  "mailEnabled": false,
  "displayName": "GraphSite10",
  "mailNickname": "GraphSite10",
  "securityEnabled": false,
  "groupTypes": [
    "Unified"
  ]
}
After submitting the POST request, you’ll get the Entra ID group and the Site created. This is a sample response, upon submission of the request.
{
    "@odata.context": "https://graph.microsoft.com/v1.0/$metadata#groups/$entity",
    "id": "d32e29f1-68e2-4a55-a9cd-bda027125522",
    "deletedDateTime": null,
    "classification": null,
    "createdDateTime": "2024-11-01T23:32:57Z",
    "creationOptions": [],
    "description": null,
    "displayName": "GraphSite10",
    "expirationDateTime": null,
    "groupTypes": [
        "Unified"
    ],
    "isAssignableToRole": null,
    "mail": "[email protected]",
    "mailEnabled": true,
    "mailNickname": "GraphSite10",
    "membershipRule": null,
    "membershipRuleProcessingState": null,
    "onPremisesDomainName": null,
    "onPremisesLastSyncDateTime": null,
    "onPremisesNetBiosName": null,
    "onPremisesSamAccountName": null,
    "onPremisesSecurityIdentifier": null,
    "onPremisesSyncEnabled": null,
    "preferredDataLocation": null,
    "preferredLanguage": null,
    "proxyAddresses": [
        "SMTP:[email protected]"
    ],
    "renewedDateTime": "2024-11-01T23:32:57Z",
    "resourceBehaviorOptions": [],
    "resourceProvisioningOptions": [],
    "securityEnabled": false,
    "securityIdentifier": "S-1-12-1-3543017969-1247111394-2696793513-576000551",
    "theme": null,
    "uniqueName": null,
    "visibility": "Public",
    "onPremisesProvisioningErrors": [],
    "serviceProvisioningErrors": []
}

As one can see below, the SharePoint site was created.

With the Postman approach, you can see the benefit: You really don’t rely anymore on PowerShell. With Graph you can create SharePoint Sites, with every REST API execution host.
Conclusion
With the approach, we have a straight forward approach to create SharePoint sites, without being dependent on PowerShell. Now I am curious about your setup: Do you create SharePoint Sites as part of a workflow? Which business use case are you supporting with it and what else are you creating apart from the SharePoint Site?
References
- Here you can find the official Microsoft reference to the Microsoft Graph endpoint /post:
Create group – Microsoft Graph v1.0 | Microsoft Learn - Here you can find an article, which elaborates how to create SharePoint Sites with Pnp.PowerShell:
A Complete Guide For SharePoint Site Creation with PowerShell - Here you can find guidance how to create Azure App Registrations:
How to configure Azure App registration for MS Graph - You might be curious about various SharePoint PowerShell Modules:
3 of the most important SharePoint PowerShell Modules and Snappins
